if (window.ab == true) ( document.write("
American reader with backlight KINDLE PAPERWHITE 5 for only 5900 rubles.
Delivery in Russia - free of charge!
");
}
One of the most popular book reading programs is Cool Reader, developed by Vadim Lopatin. The author has created a unique algorithm for splitting text into pages, in which the image on the screen is as close as possible to the paper version. Unlike most similar programs, footnotes in the text are shown at the bottom of the page. The program is multiplatform. It is applicable for operating systems Windows, Android, Symbian, some e-books running Linux OS ( Jinke/LBook V3/V5/V3+/V60, Azbooka N516, Pocketbook, Amazon Kindle, Onyx Boox and some others).
This article describes the fine-tuning of Cool Reader for the Android operating system. The author of the article made changes to the standard settings, which, in his opinion, made it possible to obtain an image on the device screen that is close to the text of a paper book. You can follow suit or make changes to the settings of your choice.
All images used in this article were taken with the Nook Simple Touch.
Cool Reader main screen
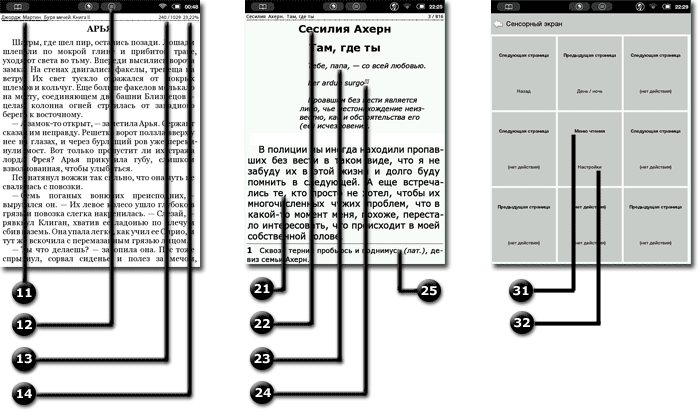
The figure on the left shows the screen in read mode. In the header of the screen on the left, when reading FB2, EPUB files, the author's first and last name, as well as the title of the book, are displayed. When reading TXT format, the filename is displayed at this location. The right side of the header shows the ratio of the number of pages read to the total number of pages in the book. It is followed by the battery level as a percentage.
Under the header is a progress bar of the material read. The thick line corresponds to the percentage of the book read, and the thin line corresponds to how much is left to read. The thin line is separated by strokes showing the ends of the chapters of the work being read.
Above the footer is the menu call icon , to the left is the “back” icon.
To call up the main menu, touch the menu icon or the middle of the screen (default setting). To go to the program settings, click on the "Settings" icon.
The main menu of the program contains five tabs. Let's consider them sequentially.
The first tab of the menu "Settings".
The first tab with the image of two letters "A" allows you to customize the main font of the book. To achieve the most bright, eye-pleasing font, you can select it from the list of available fonts in the device, or add it in advance special fonts.
The hyphenation dictionary is responsible for the correct splitting of the word into parts when transferred to the next line, line spacing can achieve more lines on the screen, hanging punctuation is responsible for indenting the last line before a new chapter.
The second tab of the menu "Settings".
This tab controls the styles of all other text blocks - epigraphs, chapter headings, annotations, etc. We will correct them sequentially.
Almost every book begins with an abstract. If you scroll to the bottom of the CSS tab, you can see the "Annotation" item. By default, annotation text is printed in italics and is the same size as body text. You can open the font size tab and make it slightly smaller than the main font of the book - for example, select the "Reduce by 80%" item.
You can change the title fontusing the menu item "Header", but in our opinion it is quite bright and readable, but the text of the epigraph, as well as annotations, can be made somewhat smaller than the main text.
The footnote text style can also be reduced to 80% in the Footnotes menu item, and the footnote number style enclosed in square brackets (Footnote Link menu item) can be reduced to 70% of the body text size. In addition, in this menu item, select "Font Style" - "Italic".
With these settings, the text in Cool Reader looks more like a paper original.
The third tab of the menu "Settings".
Here are the menu items that are responsible for the position of the text on the page, the background and text colors, as well as the presence of the toolbar. The menu is very simple and easy to understand. In this tab, you can leave everything unchanged.
Fourth menu tab.
There is a lot of room for creativity in this tab. If you are the lucky owner Nook Simple Touch, With firmware from Zerolab then we recommend changing the program control keys. Go to the "Buttons" menu and change the action of the "Menu" button from "Reading Menu" to "Next Page", the action of the "Back" button to "Previous Page". This will give you the ability to turn pages in Cool Reader using the buttons with either hand.
In the Touch Screen menu, you can customize any of the nine touch zones the way you want. Moreover, two functions can be assigned to each of the touch zones - for short-term and long-term pressing. You can generally disable all actions by making the program screen insensitive to pressing (with the exception of the status bar) and use only the device keys.
The last (fifth) tab of the menu contains system settings of the program - interface language, dictionary settings, book cover properties. Everything is fine here and nothing can be changed.
How to add online catalogs (OPDS catalogs) to Cool Reader is written in the section "Digital Libraries".
You can download the program for free from the Google Play Market.
if (window.ab == true) ( document.write(" "); )